Notes of Adobe Photoshop For DIT
Introduction to Adobe Photoshop
Adobe Photoshop is a graphics-editing program. Photoshop is used for creating and editing images for printing and for web development. Photoshop is equipped with high-quality features which are easy is use. many version of adobe application are introduc by Adobe Adobe Systems Incorporated. NowAdobe Photoshop CS. Thus, Adobe Photoshop CS5 is the 12th major release of Adobe Photoshop.
Features of Adobe Photoshop
Photoshop is equipped with high-quality features and with help of these features we can enhance our images for example provide various Filter effect which are apply with some click also provide blending mode which can help blend different layers. Photoshop uses more then one color models like that RGB, lab, CMYK, grayscale, binary bitmap, and duotone which can help in developing the images for printing and for web. Photoshop has the ability to read and write raster and vector image formats such as .EPS, .PNG, .GIF, and .JPEG. Photoshop has ties with other Adobe software for media editing, animation, and authoring. The advanced Adobe version also provide sport to windows touch devices. A number of UI improvements make the Fill dialog more intuitive and easier to use.
Elements of the Adobe Photoshop Workspace (Interface)
In Adobe Photoshop we can create and manipulate the documents and files using various elements, such as panels, bars, and windows. Any arrangement of these elements is called a workspace.
These elements also refer as Elements of Adobe Photoshop Interface.
Following are the elements of Adobe Photoshop Workspace.
1. The Menu Bar
2. The Options Bar
3. The Toolbar
4. The Palettes
5. The Document Window
6. The Active Image Area
1) Menu Bar:-
The menu bar is organized into specific categories of tasks for example File, Edit, Image, Layers etc. Menus are probably the most familiar interface elements to a new Photoshop user. They contain all sorts of options.
2) Option Bar: -
The option s bar contains options for the specific tool we have selected in the toolbar.
The options bar located directly underneath the menus. Option bar is a useful tool when working with the different Photoshop tools.. When you switch from one tools to other these options change.
3) The Toolbar: -
Most important element of the Photoshop interface is the toolbar. It contains a bunch of icons that represent the different tools Photoshop offers to alter and create images. These include tools for selecting specific areas of images, changing the colors of the image, stretching, transforming, and erasing parts of an image, and many more.
4) The Palettes or Panes : -
The palettes allow us to modify and monitor what we are working on.
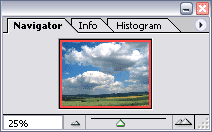
The Navigator Palette
Used for navigating large images or navigating images when zoomed in.
The Color Palette
Allows us to select foreground and background colors. While we can also do this within the toolbar this palette offers greater options.
The History Palette
Allows us to reverse changes we have made to our image. It contains a list that is constantly updated of changes made inside the document.
The Layers Palette
Allow you to work on a single canvas. Allowing some things to appear above and below others.
5) The Document Window
The window that contains the image we are working on.
6) The Active Image Area
How we Customize The Workspaces In Adobe Photoshop?
In Adobe Photoshop we can create and manipulate the documents and files using various elements, such as panels, bars, and windows. Any arrangement of these elements is called a workspace. In photo shop when we work then if we want to place the entire element in photo shop interface then this process is called customization of photo shop interface.
Step for Customization of Work space:
First of All arrange the different element. You can place any element anywhere you want with mouse dragging. And open or close any element form windows menu.
For this purpose open window menu and tick the element which you want to display.
Saving the Work space:
When everything is done and when you are happy with your custom arrangement, then simply go to Window: Work space: Save Work space, name it what you want and then it will remember the exact locations of where everything is so that you can switch to other created work spaces and reload whichever one you want.
Adobe Photoshop Tolls
Following tools are used to edit an image in Adobe Photoshop.
1. Marquee Tool
Used for selecting areas of an image. This tool is used to draw selections based on geometric shapes. Specifically, the marquee tool allows you to draw rectangular and elliptical selections. To form the selection, simply click and drag the mouse.
2. Move Tool:
Used for moving an object to a different area of the canvas.
3. Lasso Tool
Used for selecting areas of an image that may not necessarily be comprised of straight lines.
To create a free form selection, simply choose the lasso tool and click and drag on the canvas. The selection will follow your drag.
4. Magic Wand Tool
Used for auto selecting large areas of an image that is similar in color.
5. Crop Tool
Used for reducing the image to a certain area
6. Slice Tool
Used to a slice an image into different sections; generally used for the creation of images for a web page design
7. Healing Brush Tool
The Healing Brush tool allows you to fix image imperfections such as scratches, blemishes, etc. By sampling the surrounding area or using a predefined pattern you can blend the imperfections into the rest of the image.
8. Brush Tool
Brush tools is Used with the mouse to simply draw lines on your image, paint the image with different shape.
9. Clone Stamp Tool
Used to cloneor copy one area of an image to another object. First we select the source by holding Alt and click an area of the image to copy, then click on a different area to copy it there.
10. History Brush Tool
The history brush uses a previous state or snapshot of an image. The tool makes a copy of the image as it was in a previous state, then uses the content of this copy to paint with.
11. Eraser Tool
This tool is used to erase certain areas of an image. Click on the eraser icon and then click on an area on the canvas and while holding the mouse button down, start dragging the cursor around the canvas the aria under the eraser will be deleted.
12. Gradient Tool
The Gradient tool allows you to specify a gradient of color. Using it is fairly easy, you simply choose the gradient tool from the toolbox click on the canvas and drag out an area to fill with the gradient.
13. Blur Tool
The Blur Tool unfocused image areas.
14. Dodge Tool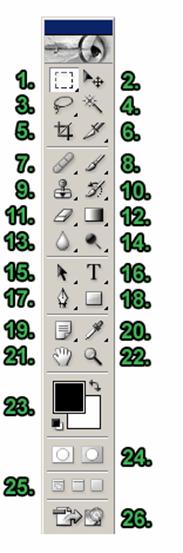
The Dodge tool lighten the areas of the image. The more you paint over an area with the Dodge tool, the lighter it becomes.
15. Path Selection Tool
Used merge overlapping components into a single component
16. Type Tool
Used to place text on an image
17. Pen Tool
The first is the Pen Tool, you can use this tool to create a vector, there are handles present in every point you made, this handle is used to adjust a curve or change the position of the point.
18. Rectangle Tool
Used to draw rectangles and other polygons.
19. Notes Tool
Used to leave notes for yourself on your image.
20. Eyedropper Tool
The eye dropper tool is used to pick up a color value from the canvas. This is a very useful tool because there will be many times when you want to switch colors while painting to a color already on your canvas and you do not want to go all the way through the color chooser dialog. In these cases, simply click on the eye dropper tool in the toolbox and click on the color you want to select inside the canvas. When you do so, your foreground color in your color boxes will change to the selected color.
21. Hand Tool
Used to quickly view different areas of an image.
22. Zoom Tool
This tool used to zoom in and out of an image. The zoom tool allows you to zoom in on the image to get a better idea of the actual pixel makeup of a section you are working on.
23. Foreground / Background Color
Used to set the foreground (front) and background (back) colors of an image; can also be used to change the colors of text, etc. Click on the boxes to change the colors (a new window will appear).
24. Edit Modes
Used to switch back and forth between modes
25. Switch Screen Modes:
Used to switch between full screen and standard screen modes
26. Jump to Image Ready
Used to easily launch the Image Ready program.
What is Layer and how we create New layer?
One of Photoshop s most powerful features is the ability to create and use multiple layers within the same image.
A layer is simply one image stacked on top of another. You can see through transparent areas of a layer to the layers below.
Each layer edited independently of each other. and then later combined to form a single, flat image. When you first create an image, you will be working with the Backgroundlayer. You cannot always use all effects on a background layer, so you may wish to start working directly with normal layers.
Create New Layer : -
1-To create a new layer, Follow the Following Steps:
2- click the Layer menu
3- Select New from the Layer menu (or click Shift+Ctrl+N).
4- In the new window that pops up, click OK.
5- You can also insert new layer form Layers, Channels, and Paths Palette.
6- For this purpose click on the New layer Icon from Layer Palette.
7- You will notice that Layer 1 is above Background in the window.
What are the Elements of Layers Palette?
In The layers windows we can see the following options:
1. Paintbrush Symbol
This symbol (and the blue shading of the layer) notes the currently active layer
2. Show / Hide Layer
When the eye icon is visible, the layer is displayed in your project. If the eye is clicked, then the layer is hidden but not deleted.
3. Link Icon
Indicates if the layer is currently linked to another layer. When linked, layers act locked together (and will move with each other, accordingly), but still remain separate layers. Layers can be linked together by selecting one layer, and then clicking the boxes in the other layers to display the Link icon (number three on the above list and image).
4. Background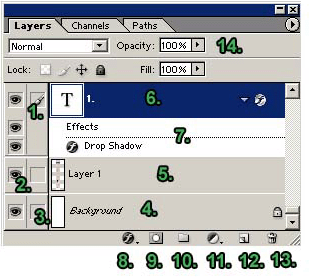
The Background is technically not a layer, however, it can be edited. It is the bottom-most portion of the image.
5. Layer
Each layer has its own name (default is by numbering). Click a players name to edit on that layer.
6. Effects
When you add effects to a layer, a sub-menu appears with that layer listing the effect applied to it. Double-click an effects name to bring up that effects menu to make adjustments.
8. Add a Layer Style
By picking an option from this menu (such as Drop Shadow, Inner Glow, or Bevel and Emboss), you can apply special effects to a layer.
9. Add a Mask
Masks are used to hide pixels on a layer in order to view the rest of the image. Layer masks are either a black or white background color.
The default color is white, which lets pixels be seen, while black hides pixels.
10. Create a New Set
By making a new set, you can create a separate folder for layer storage.
11. Create New Fill or Adjustment Layer
The options in this menu allow you to change the color properties and dimensions of a layer. For example, you can make a layer lighter or darker, add a gradient (a blending of two colors), or invert the entire layer.
12. Create a New Layer
Clicking on this icon creates a new layer. You can name your layer in the text box that appears and position it in the palette.
13. Delete a Layer
Deletes the currently selected layer. You can also drag a layer to the trash.
14. Opacity
Use this to adjust a layers opacity (its transparency).
What is Transform in Photoshop?
In Photoshop, Transform is used to scale, rotate, skew, and just distort the perspective of any graphic youre working with in general.
Scaling Graphics
One of the most basic transformations Photoshop is capable of is scaling a graphic. Scaling allows you to enlarge or shrink a graphic around a reference point.
To scale a graphic, we go to Edit > Transform > Scale.
A set of handles will appear around our selected elements in the document (such as layers, or shapes). By moving anyone of these handles, we can adjust the size of the object. To apply the transformation, hit Enter.
Constraining Proportions while Scaling
Often times, you ll find it necessary to constrain the proportions of your objects when scaling. This can easily be achieved by Holding Shift while dragging a transformation handle. You can additionally scale from the center reference point by Holding ALT or combine the two by holding shift and alt at the same time while scaling.
Rotating Objects in Photoshop
To Rotate an Object in Photoshop:
Go to Edit > Transform > Rotate.
Handles will appear as they did with a Scaling Transform, but instead of dragging one of these, go just outside of the object until you see a curved arrow rotate icon.
At this point, simple drag left or right to rotate the selected object. Once again, you must finish applying the transformation by pressing Enter.
You can rotate in 15 Degree Increments with this useful little shortcut. While you ™re rotating an object, simply hold down the shift button.
Skew, Distort, and Perspective Transformations
The next 3 transformations are all similar, because they are all controlled by dragging handles.
That is not to say that they are used to do the same thing, they simply all operate in the same manner. You can apply a Skew, Distort, or Perspective Transformation from Edit > Transform.
Skew: Skew transformations slant objects either vertically or horizontally.
Distort: Distort transformations allow you to stretch an image in ANY direction freely.
Perspective: The Perspective transformation allows you to add perspective to an object.
Free Transform:
You can also use Free Transform form Edit menu. Or Pressing CTRL+T Key and perform all the above operation on same time.
What are Layer Styles?
Layer styles are special effects that can be quickly and easily applied to individual layers in Photoshop to drastically change the appearance of something in very little time. They can be preset, customized, or even saved and used for later.
One of the useful properties of Layer Styles is there relationship to the layer contents. Since the style is actually a separate entity that is just linked to the layer, it will continually update itself as a layers contents are edited or moved. Furthermore, the effects can easily be adjusted after applying them, making them non-destructive in nature.
Using Layer Style Presets
Photoshop comes packed with a good number of Layer Style Presets, all which are accessible through the Styles Palette (Window > Styles). To apply a Layer Style, select the Layer you d like to work within your document from the Layers Palette, and then select the Layer Style, which you would like to apply.
How we Undo The Previous Steps ?
Most operations can be undone if you make a mistake. Alternatively, you can restore all or part of an image to its last saved version. But available memory may limit your ability to use these options.
To undo the last operation:
Choose Edit > Undo.
We can also use CTRL +Z command
By default if you want to undo more then on steps then press CTRl+ALT+Z Key at a time.
History Plate for Undo:
We can also use History palette for this purpose. The History palette lets you jump to any recent state of the image created during the current working session. Each time you apply a change to an image, the new state of that image is added to the palette.
For example, if you select, paint, and rotate part of an image, each of those states is listed separately in the palette. You can then select any of the states, and the image will revert to how it looked when that change was first applied. You can then work from that state.
To display the History palette:
Choose Window > History, or click the History palette tab.
What is Revert and Purge command:
Choose File > Revert.
When you Revert an image, you return the image to the last time it was saved. Its means that when we apply Revert Command then All the steps Undo Automatically and Image become In The Initial State when its saved.
Purge Command:
Purge command is used to free the buffer where previous action was stored. For this purpose we
Choose Edit > Purge, and choose the item type or buffer you want to clear. If already empty, the item type or buffer is dimmed.
The Purge command permanently clears from memory the operation stored by the command or buffer; it cannot be undone. For example, choosing Edit > Purge > Histories deletes all history states from the History palette. Use the Purge command when the amount of information held in memory is so large that Photoshop's performance is noticeably diminished.
How we Linking Layers?
In the layers palette, you can link different layers to each other. This will allow you to move them together (when you are on the "V" move tool).
Just click on the layer you want to be on and then click on the link box and pick other layers in the palette to link to by simply clicking on their link box; this will link those layers to this layer.
You can unlink by clicking the link box again. You can link fast by clicking and dragging down the entire row (you can also unlink this way).
Adobe Photoshop Navigation Tools
Navigation in Photoshop is a very import aspect of retouching. It's important that we're able to quickly zoom in/out, move the canvas or compare the retouched part of an image with the original. The Zoom Tools and Hand tools are both navigation tools.
Zoom Tool:
Zooming in on one particular area in an image is easy. Select the Zoom Tool icon in the Tool Bar and use the mouse to select the area that you want to magnify and release the mouse button.
Navigation is also don form navigator palette. And also with short cut keys through keyboard CTRL+ (+) for Zoom out and CTRL + (-) key for Zoom IN. if we have a wheel mouse; rolling the wheel away from us allows us to zoom out, rolling the wheel towards us allows us to zoom in. Note: sometimes you need to hold down the Alt key when you use the scroll wheel.
Hand Tool: œ
If your image doesn't fit in your document window, then you have to select the Hand Tool in the toolbar and use your mouse to move your image by clicking and dragging it inside your document window.
For this purpose select The hand tool and drag the image with the help of mouse.
You can also use wheel mouse by rolling the wheel up down and CTRL + rolling wheel Left and Right.
How we Resize an Image In Adobe Photoshop?
If we want to adjust the height and width you can resize your image to any dimensions you wish.
Select Image Size from the Image menu.
The default in Photoshop is to keep image resizing at Constrain Proportions. This means that if the height is changed, the width will be changed at the same ratio.
This keeps your image looking approximately the same, only at different sizes. If you wish to change this, just un-click the Constrain Proportions check box at the bottom of theImage Sizewindow.
You can change the image size either by pixels or percentages. Use either you wish to either enlarge or reduce the size of your image (keep in mind that enlarging images will reduce the quality).
Adobe Photoshop Moving Tool
The move tool allows you to move a selection or entire layer by dragging it with your mouse or using your keyboard arrows keys. The move tool is located at the top right of the Photoshop Toolbox.
When the move tool is selected, click and drag anywhere in the image. By default, if an area is selected the selection will be moved, otherwise the whole layer will be moved. See the options bar for more options.
Alternatively, use your arrow keys to move the selection or layer in small increments. Hold down the Shift key to move in larger increments.
Adobe Photoshop Marquee Tools
The marquee tools are selection tools which allow you to select rectangles, ellipses and 1-pixel rows and columns. The marquee tools are located at the top left of the Photoshop Toolbox. Click and hold your mouse over the marquee tool to see the four options:
Rectangle Marquee
Make a rectangular selection. Hold the shift key down to constrain the selection to a square.
Elliptical Marquee
Make an elliptical selection. Hold the shift key down to constrain the selection to a circle.
Single Row Marquee
Make a horizontal selection 1 pixel high.
Single Column Marquee
Make a vertical selection 1 pixel wide.
How we select The Part of any image by Marquee Tools
Open an Image
Select The Marquee Tools form Tool Box or click on tool bar and Press M.
Select any one tool from Rectangular Marquee Tool or Elliptical Marquee tool or any one which you want to need depending on your selection.
Note that a square is a special case of rectangle and a circle is a special case of ellipse. To get a square from a rectangular marquee or a circle from an elliptical marquee, simply press and hold the SHIFT key while you drag out your selection.
For anti-alias your selection, you can use the anti-alias checkbox or the feather checkbox or both. The feathering checkbox simply affords an extra degree of anti-aliasing.
Adobe Photoshop Magic Wand Tool
The Magic Wand tool Used for auto selecting large areas of an image that is similar in color. The tool is located near the top of the Photoshop Toolbox.
When you click an area in an image with the magic wand, all areas which are a similar colour are selected. You can specify various options to determine the exact selection.
Using the Magic Wand Tool
Select the magic wand tool in the toolbox.
In the options bar, select a Tolerance value (0 to 255). This determines how closely to match colours - higher tolerance means a larger selection.
i- Check Anti-aliased to define a smooth edge to the selection.
ii- Check Contiguous to select only areas, which are joined together.
iii- Check Use All Layers to select areas from all layers.
iv- Click the image in an area, which you want to select.
Note: You can add and subtract to the selection by using your Shift and Alt keys, or clicking the selection buttons in the options bar.
Adobe Photoshop Lasso Tools
Lasso Tool is used for selecting areas of an image that may not necessarily be comprised of straight lines. To create a free form selection, simply choose the lasso tool and click and drag on the canvas. The selection will follow your drag. The lasso tools allow you to select precise areas of an image by drawing or tracing the selection outline.
There are three lasso tools available:
simple Lasso Tool
This is a freehand selection tool. Click and hold your left mouse button on the image and draw your selection.
Polygonal Lasso Tool
Similar to the lasso tool, except that instead of holding your mouse button down to draw, left-click on various points to create a selection with a series of straight edges.
You can also hold down the Alt key (Windows) or Option key (Mac OS) to draw freehand sections.
Magnetic Lasso Tool
This is a very handy tool for selecting areas which have reasonably well-defined edges. Left-click at the starting point of your selection and simply move the mouse along the edge.
"Fastening points" are automatically made at various points along the edges. Left-click at any time to add a fastening point manually.
To Complete a Selection
To finish drawing a selection, either click on the selection starting point or double-click anywhere.
Use of Lasso Tool
1. Select the lasso tool in the toolbox and select Simple Lasso Tool.
2. Click and hold your left mouse button on the image and draw your selection and end at the start point.
3. Your selection is done.
Use of Polygonal Lasso Tool
1- Select the lasso tool in the toolbox and select Polygonal Lasso Tool.
2- Left-click at the starting point of your selection and simply moves the mouse along straight edge.
3- By pressing Left-click at any time to add a fastening point and then simply move the straight line.
4- To finish drawing a selection, either click on the selection starting point or double-click anywhere.
Use of Magnetic Lasso Tool
1- Select the lasso tool in the toolbox and select Magnetic Lasso Tool.
2- Left-click at the starting point of your selection and simply moves the mouse along the edge.
3- "Fastening points" are automatically made at various points along the edges. Left-click at any time to add a fastening point manually.
4- To finish drawing a selection, either click on the selection starting point or double-click anywhere.
Adobe Photoshop Slice Tool
Used to slice an image into different sections; generally used for the creation of images for a web page design. The slice tool is located in the top section of the Photoshop Toolbox.
There are two tools: Slice (which creates the slices) and Slice Select (which enables you to select and modify existing slices).
How we slice the image with Slice Tools
Sliced images are commonly used for web design work, which sometimes requires images to be broken up in this way.
Using the Slice and Slice Select Tools
1- Select the slice tool in the toolbox.
2- Click and drag over the area you wish to make into a slice.
3- Release the mouse button - Photoshop automatically creates the necessary number of slices, with the active slice highlighted.
4 Using the slice select tool, you can move and resize slices by dragging inside a slice, or by dragging the handles.
5 To export the separate images, choose File > Save for Web from the Photoshop File menu.
6 When you save the file you will have the option to save the images and/or a new HTML page to contain the images.

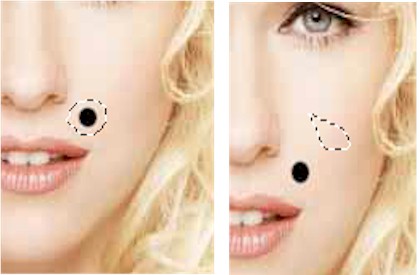
Adobe Photoshop Healing Brush Tool
The Healing Brush tool allows you to fix image imperfections such as scratches, blemishes, etc. By sampling the surrounding area or using a predefined pattern you can blend the imperfections into the rest of the image.
Use of Healing Brush Tool The healing brush tool is located in the Photoshop Toolbox, on the left side.
Use of Healing Brush Tool
1. Select the healing brush in the toolbox.
2. Check the settings in the options bar and adjust if necessary. Options include:
3. Brush size
4. Blending mode
5. Source (Sampled from the image or pre-defined pattern)
6. Aligned
7. If you're using sampled mode, Alt-click an area near the imperfection to define the starting
point (Select The sample which you want to mix on the spot)
8. Now click on the spot which you want to remove.
9. Done.
Adobe Photoshop Patch Tool
The Patch tool is handy for repairing image flaws. Just like spot on the image and cracks colors etc. To fix these problems first you define a selection that needs repairing. Then you drag the selection to a source area to make the repair.
1. Open an image in Photoshop (File > Open) and select the Patch tool or press ( j key).
2. To make sure there are no current selections, choose Select > Deselect ( CTRL+D) key.
3. Using the Patch tool, draw a marquee around the area to repair.
4. Click inside the selection and drag the selection to define the source for the repair.
Adobe Photoshop Clone Stamp Tool
With the help of Clone Stamp we can Clone or copy one area of an image to another.
The process involves setting a sampling point in the image which will be used as a reference to create a new cloned area. Select the Clone Stamp tool , then check the settings in the options bar. Make sure you have a brush size appropriate for the job. The following settings are fairly typical:
1. Aligned: If this option is selected, the new cloned image will be drawn continuously even if you release the mouse button while drawing. If it is deselected, the clone will begin drawing from the sampling point each time you release the mouse and resume painting.
2. Use All Layers: If this option is selected, information will be used from all visible layers. Otherwise only the active layer will be used.
How we clone The Image on other Place
1. Open the image.
2. Hold down the Alt key the cursor will change to a target. Click the point you wish to use as a sampling point (Click on that Point Which you want to copy). This will be used as the reference point for cloning.
3. Click and draw where you want the cloned image to appear.
4. As you draw, a cross will appear on the original image while a corresponding circle appears where you are drawing.
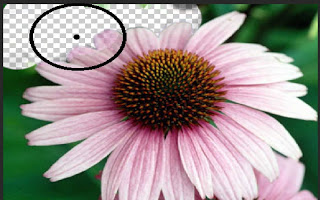
Adobe Photoshop Eraser Tool
Photoshop's eraser tool can be found in the second group of icons in the toolbox. It has three variations: Eraser, Background Eraser and Magic Eraser.
The eraser is basically a brush which erases pixels as you drag it across the image. Pixels are erased to transparency or the background color if the layer is locked.
When you select the eraser tool, you have various options available in the toolbar:
Brush: Options include the size of the eraser, hardness of edges and various styles. Brush options are not available in block mode.
Mode: There are three options:
Brush (soft edges)
Pencil (hard edges)
Block (square brush size).
Opacity:
100% opacity erases pixels completely, 0% does not erase at all. 50% is semi-transparent (or coloured). Opacity is not available in block mode.
Flow: Determines how quickly the erasure is applied by the brush. Lower settings produce a more subtle effect. Only available in brush mode.
Airbrush: Use the eraser as an airbrush. Only available in brush mode.
Erase to History: Erases to a saved state or snapshot of the image. To use this feature, click the left column in the history palette next to the desired state.
Background Eraser Tool
The background eraser tool allows you to remove the background colour from an image or layer. When you click the image, the eraser samples the colour at the centre of the brush and erases this colour as you drag. Options in the toolbar allow you to specify the type of erasure, colour tolerance and sampling method.
Use of Background Eraser
Open The Image from which you want to delete the background color.
Click on Eraser tool and select the Background Eraser.
Now set The Sampling option from option bar Continues, Once, Sampling
If you select continues then when you click on target the color for deletion is selectde under the Background Eraser.
If you select once then when you click first time on target the color for deletion is selected under the Background Eraser and remain until you click again.
Magic Eraser Tool
The magic eraser tool erases all colours within a set tolerance. This is essentially the same as using the magic wand and hitting Delete. Using this tool you don't need to drag ” just click once.
Use of Magic Eraser
1- Open the image
2- Select the Magic Eraser Tool from Eraser.
3- Now Set The Tolerance of color from Option Bar. ( Low tolerance delete the 100% match color)
4- Click on the color which you want to delete.
5- Finish.
Adobe Photoshop Blur Tool
The Blur Tool unfocused image areas. Blurring can be useful if some element of your image stands out too much, and you would like to soften it. If you want to blur a whole layer, or a large part of one, you will probably be better off using one of the Blur Filters.
Use of blur Eraser
Open the image
Select The Part of image which you want to blur.
Select the blur Tool form tool Bar.
Adjust the Strength of blur.
Paint the selected aria of the image with blur tool.
Finish.
If you want to bur whole image then don t select the image.
Select the Filter Menu.
Select The Blur, and then select Simple blur or Gaussian blur (More Blur The image).
Adobe Photoshop Sharpen Tool
The Sharpen tool increases the contrast among adjacent pixels to give the impression that things are sharper. Sharpening a image means making the edges of the objects more prominent.
Use of Sharpen
Open the image
Select the Sharpen Tool form (blur, sharpen, smudge group) tool Bar.
Adjust the Strength of Sharpen.
Paint the selected aria of the image with sharpen tool.
Finish.
If you want to sharpen whole image then select the Filter Menu.
Select The Sharpen, and then select Sharpen or Sharpen Edges.
Adobe Photoshop Smudge Tool
The smudge can be useful if you want to blur out the edges of photos. Smudge Tool spreads and mixes content of image areas.
Use of Smudge
Select the Smudge tool.
Choose brush size and style.
Set the tool's strength.
Drag on the image.
In the Options bar, you can also specify the effect's "Mode".
Adobe Photoshop Pen Tool
The Pen Tool creates straight lined and smooth curved vector shapes and paths. Use of Pen
1. In the Toolbox, select the Pen Tool.
2. Choose a drawing mode from option bar. For example Shape Layer.
3. Click on the image to set the first anchor point.
4. Set another anchor point to add a segment.
5. You can add an anchor point.
6. You can also delete anchor point.
Adobe Photoshop History Brush Tool
History Brush is use to restore the image attribute from an earlier point in a picture's history. We say that History Brush Tool allows you to paint and reveal previous states of images.
Use of history Brush
For example if we delete any part of the image.
Then
Select the History Brush Tool.
Choose brush size and style.
Paint the aria which is deleted in previous step.
You can see that all the deleted part recovers.
Adobe Photoshop Crop Tool
This tool is used for reducing the image to a certain area (cropping). In saimpl word we say that Crop Tool cuts out a defined area of the image.
Use of Crop Tool
Select the Crop Tool from tool box.
Click on the image and draw a rectangle holding mouse's button pressed.
When you release the button a bounding box appears.
To apply crop pres [Enter] key or right-click on the image and choose Crop from context menu.
Brush Tool and Pencil Tool
Photoshop provides two tools for drawing (painting) directly to the image: The brush tool and the pencil tool. Both tools work basically the same way.
Press left-click and drag your mouse in the image to draw. Painting uses the currently selected foreground color.
Adobe Photoshop The Brush Tool
The brush tool paints with smooth edges. The options bar looks like this:
Settings: 1. Brush: The size of the brush.
2. Mode: The blending mode. For most work Normal will be the best option. Experiment with other modes to see what they do.
3. Opacity: Anything less than 100% will allow the underlying image to be seen.
4. Flow: Determines how quickly paint is applied. Lower setting produces lighter strokes.
The Airbrush Tool
The airbrush option allows you to apply gradual tones to an image, like a traditional airbrush.
The pencil Tool
The pencil tool behaves much like the brush except that it has hard edges. The pencil tool options are the same as the brush tool, except there is no airbrush option.
Paint Bucket Tool
The paint bucket tool fills an area of an image based on color similarity. Click anywhere in the image and the paint bucket will fill an area around the pixel you clicked.
The exact area filled is determined by how similar each adjoining pixel is to the pixel you clicked on. You can adjust this setting in the options toolbar by changing the tolerance value (make sure the paint bucket tool is selected first). A low tolerance means only very similar colors will be affected, a high tolerance means more pixels will be affected. The range is 0 (exact color matches only) to 255 (all colors).
Other settings in the options bar include:
1. Fill: Foreground color (i.e. the currently selected color) or Pattern. If you select pattern, the next drop-menu becomes active and you can choose a pattern to use.
2. Mode: The same "blending modes" found in many other tools, including normal, dissolve, lighten, darken, etc.
3. Opacity: Set lower to make the underlying image partially visible.
4. Anti-alias: Make smoother edges by blending gradually with adjoining pixels.
5. Contiguous: When the contiguous checkbox is selected, only pixels that are connected to the original pixel are filled.
Gradient Tool
Gradient tool allows you to fill a gradient (multi color effects) of color. Simply choose the gradient tool from the toolbox click on the canvas and drag out an area to fill with the gradient. The larger the drag the more gradual the gradient will be. Pressing and holding the shift key will create perfectly aligned gradients.
Use of Gradient Brush:
1. Create a new blank layer.
2. Select the paint bucket tool and select Gradient tool or press G then shift + G.
3. Click and drag a gradient path to fill the canvas with a gradient.
4. Finish
Adobe Photoshop Dodge Tool
The Dodge tool lightens image areas. You can paint over an area with the Dodge tool, for making lighter the image or selected aria.
Use of Dodge Brush:
1. In the Toolbox, select the Tool.
2. Choose brush size and hardness.
3. Set exposure (stroke strength).
4. Drag on the image.
5. In the Options bar, you can choose also the tool's range: Shadows, Midtones or Highlights.
Adobe Photoshop Burn Tool
The Burn tool is used for darkens image areas or whole image. You can paint over an area with the Burn tool, for increase the darkness in the image or selected aria.
Use of Burn Brush
1. In the Toolbox, select the Burn tool.
2. Choose brush size and hardness.
3. Set exposure (stroke strength).
4. Drag on the image.
5. On the Options bar you can choose also the tool's range: Shadows, Midtones or Highlights.
Adobe Photoshop Type (Text) Tool
The Type tool is use for Adding the Text in an image. Type tool provide Horizontal Type tool, Vertical type tool, Horizontal Type Mask and Vertical Type Mask.
The Horizontal Type Tool creates and edits vector-based text in a separate layer.
The Vertical Type Tool creates and edits vector-based text in a separate layer.
The Horizontal Type Mask Tool creates type-shaped selections.
The Vertical Type Mask Tool creates type-shaped selections.
Use of Type Tool
1. Select the Type tools (For Example Horizontal Type Tool).
2. On the Options bar, set the font options: family (style), size, color and anti-aliasing method.
3. Click on your image and type.
4. While you are typing, most of the other Photoshop functions are not available. When finished, click on any tool in the Toolbox or on a layer in the Layers palette to apply the typing and return to the standard editing mode.
Adobe Photoshop Shape Tool
In photoshop you can also working with shapes. Photoshop provide the Rectangle Tool, the Rounded Rectangle Tool, the Ellipse Tool, the Polygon Tool, and the Line Tool.
The Rectangle Tool creates rectangular shapes and paths (shape outlines).
The Rounded Rectangle Tool creates rectangular shapes and paths (shape outlines) with rounded corners.
The Ellipse Tool creates elliptical shapes and paths (shape outlines).
The Polygon Tool creates polygonal shapes and paths (shape outlines).
The Line Tool creates line shapes and paths (shape outlines).
The Custom Shape Tool creates versatile shapes and paths (shape outlines).
Use of Shapes Tool
1. Select the shape tools (For Example rectangle Tool).
2. Pressing and Holding Left mouse button draw a rectangle.
How we draw Custom Shape
The Custom Shape Tool creates versatile shapes and paths (shape outlines):
1. Select the Custom Shape Tool.
2. In the Options bar, choose a drawing mode: to create vector shape layers click Shape layers button ; to draw paths (shape outlines) click Paths button; to create rasterized shapes in current layer click Fill pixels .
3. Select a shape on Custom Shape picker.
4. Click on next to button on the Options bar to set geometry options.
5. Choose shape color.
6. Hold left button and Drag on the image.
7. The selected shape draws on your image.
Adobe Photoshop Eyedropper Tool
The Eyedropper Tool defines the foreground / background color. The Eyedropper tool is used to sample a color from an image to use this color further. It's practical as it facilitates color selection, for example, an appropriate color for the skin from another image.
When you pick a color with the Eyedropper tool, it appears as the foreground color in the Toolbar. For the background hold the Alt-key while selecting the color with the Eyedropper tool.
Use of Eyedropper Tool
1. Select the Eyedropper Tool.
2. Click somewhere on your image to define the foreground color.
3. Holding Alt and Then click to set the background color.
4. In the Options bar, you can change sample size (the Eyedropper's range) the "Point Sample" picks up the color from the pixel you click on all the other samples read average values from larger areas.
Adobe Photoshop Color sampler Tool
This tool is used for viewing the color values in defined spots of your image. Thise values
display in the Info palette window.
Use of Color sampler Tool
1- Select the Color sampler Tool.
2- Click somewhere on your image.
3- Sampler #1 appeared in Info palette shows the current values in your color channels.
Adobe Photoshop Measure Tool
The Measure Tool calculates distances and angles in the work area.
Use of Measure Tool:
1- In the Toolbox, select the Measure Tool.
2- To calculate distance from one point in the work area to another, drag line between the points.
3- In the Info palette and in the Options bar, you can read the measuring line data.
Adobe Photoshop Zoom Tool
The Zoom Tool magnifies / reduces the image view without changing the image data.
Use of Zoom Tool
Select the Zoom Tool from tool box.
Click on any area of your image to magnify it.
To reduce the view, click the "zoom out" button on the Options bar; then click on your image.
Hand Tool
The Hand Tool is used for navigate an edited image, when it is not completely visible in its
window. Use of hand Tool
Select the Hand Tool from tool box.
Drag your image to bring the hidden areas into the view.
The 3 buttons on the Options bar allow you to choose one of 3 standard viewing modes - Actual Pixels, Fit On Screen or Print Size.
Adobe Photoshop Notes Tool
When we want to add some notes with image then we use notes tool.
Use of Notes Tool:
1. Select the Notes Tool from tool box.
2. Drag on the image where you want to attach a note. A resizable window appears.
3. Type your text and close the note.
4. We set the author's name and set font options from the option bar.
5. We can also edit our notes, to edit a note, open it by double-click on it, and make your changes.
6. We can also hide or show our notes by pressing Ctrl+H shortcut or from pull-down menu: Click on View and then Show and then Annotations.
7. We can also delete our notes To delete a note, either click on notes and press Delete key.
8. If we want to delete all notes then click on "Clear All" button in the Options bar.
Extraction in Adobe Photoshop
In Photoshop Extract command is used to delete the background form the object. Extracting a object from the background usually in order to place it on another background or make the background transparent.
Extracting Images from their Background
1. Open the file.
2. Select Filter Menu and select Extract .
3. In appearing window select the highlight tool set the brush size and paint a thick line around the image. Make sure the pen overlaps the both the feathers and back ground.
4. In Next step select the paint bucket and fill in the area you outline.
5. In next step click on the Preview button.
6. Select OK and your will be returned to Photoshop s main window and have a picture without background.
Option of Extract Window
The Extraction window has several tools to help you refine your selection and view what the extracted image looks like on different colored backgrounds. The main controls you have are as follows:
1) Brush size :-
This specifies the width of the highlighter, eraser, cleanup and edge touch up tools. If the edge is clearly defined make the size of the brush smaller, if the edge is fuzzy use a thicker highlight brush size.
Highlight Color : -
Highlight default color is bright green, the color can be changed to another color if the subject you are extracting has green as part of it.
2) Fill : -
Default color is blue, this determines the area of the picture you want to keep
3) Smart Highlighting :-
Select this option if you are highlighting a well defined edge, it helps keep the hightlight on the edge and applies the highlight just wide enough to cover the edge regardless of the brush size. In theory this sounds great in practice if often does not seem to help significantly.
4) Extraction Options
Textured Image: -
Select this option if the foreground or background or you image contains a lot of texture.
Smooth: -
Default is 0, enter a larger number if you want to increase the smoothness of the outline you drew. It s best to start with 0 or small value to avoid unwanted blurring of details.
Force Foreground: -
Select this option if the object is especially intricate or lacks a clear interior e.g. you can try this feature on an image like grass or subject with lots of fine hair.
4) Touch up Extraction Tools
Clean up Tool: -
This tool is used to erase background traces in the extracted areas. The tool subtracts opacity and has a cumulative effect. You can also use this tool to fill in gaps in the extracted object. Hold down Alt “ while dragging to add back opacity.
Edge Touch up tool: -
This tool sharpness edges and has a cumulative effect. If there is no clear edge, this tool adds opacity to the object or subtracts opacity from the background.
Note: Once you complete your extraction with the extract filter you continue to clean up the image using the Background eraser and the history brush tools.
What is Color Space? What is RGB, CMYK Color System?
The term color space is interchangeable with the term color mode. It s simply states the color value method you are using to work with your images from RGB, CMYK, and grey scale and alike.
Selecting Color Mode:
GO to Image Menu and Select Mode and then select the color mode.
RGB Color:
RGB stands for Red, Green, and Blue. These are the color displayed by your computer, and you re TV. It is the combination of these three colors that provide you all the colors you see while watching movies online or a movie on your TV.
CMYK Color:
CMYK stands for the four colors of in used by the printers. They are cyan, magenta, yellow, and black. The K , because B was already spoken for in the RGB color space. CMYK is what designers used to sends documents to professional printer s from magazine, poster, and alike. It is the CMYK model that give the term four color printing its meaning.
Grey Color:
Grey scale colors display 256 values of grey. Grey scale, is great to use when going for that classic vintage look or mixing part of color image with grey for emphasis on a part of an image.
Adobe Photoshop Filter Effects in Photoshop
Photoshop provide built-in filters effect we can apply these filter effects from filter menu.
Artistic Filter effect
Achieve a painterly or special effect for a fine arts or commercial project. For example, use the Cutout filter for collages or type treatment. These filters replicate natural or traditional media effects. For more information about Artistic filters, see Artistic filters. For more on the Rough Pastels and Underpainting filters, see Using texture and glass surface controls.
Blur Filter effect
Soften a selection or an image. Blur filters are useful for retouching. They smooth transitions by averaging the pixels next to the hard edges of defined lines and shaded areas in an image. For more information about Blur filters, see Blur filters.
Note: To apply a Blur filter to the edges of a layer, be sure to deselect the Preserve Transparency option in the Layers palette.
Brush Stroke Filter effect
Like the Artistic filters, the Brush Stroke filters give a painterly or fine-arts look using different brush and ink stroke effects. Some of the filters add grain, paint, noise, edge detail, or texture to an image for a pointillist effect. For more information about Brush Stroke filters, see Brush Stroke filters.
Distort Filter effect
Geometrically distort an image, creating 3D or other reshaping effects. Note that these filters can be very memory intensive. For more information about Distort filters, see Distort filters. For more about the Displace filter, see Defining undistorted areas. For more on Glass filter controls, see Using texture and glass surface controls.
Noise Filter effect
Add or remove noise, or pixels with randomly distributed color levels. This helps to blend a selection into the surrounding pixels. Noise filters can create unusual textures or remove problem areas, such as dust and scratches, from an image. The Add Noise filter can be used to reduce banding in feathered selections or graduated fills or to give a more realistic look to heavily retouched areas. For more information on Noise filters, see Noise filters (Photoshop).
Pixelate Filter effect
Sharply define a selection by clumping pixels of similar color values in cells. For more information on Pixelate filters, see Pixelate filters.
Render Filter effect
Create 3D shapes, cloud patterns, refraction patterns, and simulated light reflections in an image. You can also manipulate objects in 3D space, create 3D objects (cubes, spheres, and cylinders), and create texture fills from grayscale files to produce 3D-like effects for lighting. For more information on the Render filters, see Render filters. For information on the 3D Transform filter, see Transforming objects in three dimensions. When using the Clouds filter, generate a more stark cloud pattern by holding down Alt (Windows) or Option (Mac OS) as you choose
Filter> Render > Clouds.
Sharpen Filter effect
Focus blurry images by increasing the contrast of adjacent pixels. They include the Sharpen Edges (Photoshop) and Unsharp Mask filters, which find and sharpen areas where significant color changes occur (such as the edges). The Unsharp Mask filter is commonly used for high-end color correction. (See Sharpening images.) For more information on the Sharpen filters, see Sharpen filters.
Sketch Filter effect
Add texture to images, often for a 3D effect. The filters also are useful for creating a fine-arts or hand-drawn look. Many of the Sketch filters use the foreground and background color as they redraw the image. For more information on Sketch filters, see Sketch filters. For information on the Cont © Crayon filter, see Using texture and glass surface controls.
For a truer effect, change the foreground color to one of the common Cont © Crayon colors (black, sepia, sanguine) before applying the filter.
Stylize Filter effect
Produce a painted or impressionistic effect on a selection by displacing pixels and by finding and heightening contrast in an image. After using filters such as Find Edges and Trace Contour (Photoshop) that highlight edges, you can apply the Invert command to outline the edges of a color image with colored lines or to outline the edges of a grayscale image with white lines. (See Using the Invert command.) For more information on Stylize filters, see Stylize filters.
Texture Filter effect
Give images the appearance of depth or substance, or add an organic look.
Video Filter effect
Include the NTSC (National Television Standards Committee) Color filter, which restricts the gamut of colors to those acceptable for television reproduction, and the De-Interlace filter, which smooths moving images captured on video. For more information on Video filters, see Video filters.
Other Filter effect
Let you create your own filters, use filters to modify masks, offset a selection within an image, and make quick color adjustments. For more information about Other filters, see Other filters. For more on the Offset filter, see Defining undistorted areas.
Digimarc Filter effect
Embed a digital watermark into an image to store copyright information. For more information about Digimarc filters, see Digimarc filters.
To Preview and Apply a Filter Effect:
To apply a filter to an area of a layer, select that area.
To apply a filter to the entire layer, leave the image unselected.
Choose a filter from the sub menus in the Filter menu.
If a dialog box appears, enter values or select options.
If the dialog box contains a preview window, use the following methods to preview the effect:
If the dialog box contains sliders, hold down Alt (Windows) while dragging a slider to see a real-time preview (real-time rendering) of the effect.
Click in the image window to center a specific area of the image in the preview window.
Convert an Image to Black and White
Adobe Photoshop Using the Desaturate command
The Desaturate command converts a color image to a grayscale image in the same color mode. For example, it assigns equal red, green, and blue values to each pixel in an RGB image to make it appear grayscale. The lightness value of each pixel does not change.
To use the Desaturate command:
Choose Image menu and select Adjustments and select Desaturate.
Or Press CTRL +Shift +U Key.
Adjusting Auto Color Settings
Some time when digital photo have an issues of over or under-exposure, incorrect white-balance and hue problems. Then photo shop includes a lot of ways to correct these problems.
Auto Color:
If an image seems too warm (too orange) or too cool (too blue) this generally means that the white balance is off. You can use the "Auto Color" feature to adjust this automatically. With the file open, click Image > Adjustments> Auto Color. Photoshop will try to adjust the white balance to natural levels.
Auto Contrast
In images with very little variation between light and dark areas the auto-contrast feature will either enhance or smooth out these differences to make a better picture overall
Image > Adjustments >Auto Contrast
Merge Layers and Flatten Image
Merge Layers
Layers are a great tool that you can use while working with Adobe Photoshop, but only if you use them the right way. Too many layers can cause disorganization, increased file size and can slow down Photoshop. There is an option in Photoshop called merge layers, which allows you to merge two or more layers together to help keep you organized and working smoothly.
1. Start Adobe Photoshop and start a new blank Photoshop document.
2. Create two new layers in addition to your background by selecting the "New" option from the "Layer" menu. Then, select "New..." You should now have your background and two other layers.
3. Link your two new layers together by clicking the empty box to the right of the eye icon on your Layers palette for each of the layers. You should see a chain link appear in the empty boxes. The layers are linked together now. If you move one layer, the other layer will now move along with it.
4. Merge the two layers together by selecting the "Layer" menu and then "Merge Layers." The two layers are now merged together. You should notice the two layers are just one layer in the Layers palette.
Flatten Image Adobe Photoshop creates layers when working with an image. You can use these layers to manage and enhance the image by changing the background, highlighting portions of the image or combining two images to create a new one. When the project is complete, flatten the image to combine all the changes into one image; this reduces the overall file size. Fortunately, Photoshop makes this an easy process
1. Save your original image. Always save your original image so that you can use it again later.
2. Open the Layers palette, if it's not already open, by clicking "Windows" on the menu bar at the top of the screen. Scroll down and select "Layers."
3. Click on "Layer" in the menu at the top of the page. Scroll down and select "Flatten Image." All the layers will combine into one layer. Alternatively, click on the symbol in the top right corner of the Layers palette and select "Flatten Image." In Photoshop CS, the symbol looks like a white circle with a right-pointing arrow; in other versions, like a down-arrow with five lines next to it.
4. Save the image as a JPEG, BMP, PNG, EPS, GIF or any other format, depending on your preference.
Difference:
Flatten image flattens all layers into a flat image file and Merge layers allows you to select certain layers and only merges them, leaving the other layers intact.
Blanding Modes In Adobe photoshop
Blend modes in digital image editing are used to determine how two Layers are blended (Mix) into each other. The default blend mode in most applications is simply to hide the lower layer with whatever is present in the top layer. However, as each pixel has a numerical representation, a large number of ways to blend two layers is possible. Note that the top layer is not necessarily called a "layer" in the application. It may be applied with a painting or editing tool. There is different blending mode available in Photoshop:
Basic Modes
1) Normal: -
Normal edits or paints each pixel to make it the result color. Basically, we aren t getting any kind of effect here since both of our images are fully opaque. We re just seeing the image on the upper layer. This is the default mode for every new layer.
2) Dissolve: -
The dissolve mode takes random pixels from both layers. With high opacity, most pixels are taken from the top layer. With low opacity most pixels are taken from the bottom layer. No antialiasing is used with this blend mode, so the pictures may look grainy and harsh.
3)Screen: -
With Screen blend mode the values of the pixels in the two layers are negated, multiplied, and then negated again. This is in some way the opposite of multiply.
The result is a brighter picture.
4)Overlay: -
Overlay combines Multiply and Screen blend modes. Light parts of the picture become lighter and dark parts become darker. An overlay with the same picture looks like an S-curve.
5)Soft Light: -
This is a softer version of Overlay. Applying pure black or white does not result in pure black or
6)Hard Light: -
Hard Light combines Multiply and Screen blend modes. Equivalent to Overlay, but
with the bottom and top images swapped DivideThis blend mode simply divides
pixel values of one layer with the other.
7)Addition: -
This blend mode simply adds pixel values of one layer with the other. In case of
values above 255 (in the case of RGB), white is displayed.
8)Subtract: -
This blend mode simply subtracts pixel values of one layer with the other. In
case of negative values, black is displayed.
9)Difference: -
Difference subtracts the top layer from the bottom layer or the other way round,
to always get a positive value. Blending with black produces no change, as
values for all colours are 0. (The RGB value for black is 0,0,0). Blending with
white inverts the picture.
One of the main utilities for this is during the editing process, when it can be
used to verify alignment of pictures with similar content. Exclusion is a very
similar blend mode with lower contrast.
10)Darken : - OnlyDarken takes the darkest value for each pixel from each
layer.
11)Lighten: -OnlyLighten takes the lightest pixel from each layer.
12)Color: -Color creates a result color with the luminance of the base
color and the hue and saturation of the blend color. This preserves the gray
levels in the image and is useful for coloring monochrome images and for tinting
color images.
13)Luminosity: -
Luminosity creates a result color with the hue and saturation of the base color
and the luminance of the blend color. This mode creates the inverse effect of
Color mode.
Saving Images for the Web in Adobe Photoshop?
The internet is probably one of the largest mediums for distributing art,
graphics, and photographs nowadays, making it very important to have some basic
knowledge on saving media for the web. Essentially, saving for the web is a
balancing act. You must balance the quality of the graphic and the file size of
the media to suit your personal needs. In a place where speed is important, you
may need to sacrifice some quality of a graphic. Where quality is important, you
may need to sacrifice some speed. This lesson aims to show you ways in which you
can balance these two factors, and at the same time produce terrific image
quality.
Process of saving the image for web
Adobe Photoshop has a great way to optimize images for the web. In Photoshop, go
to File > Save For Web, or click Ctrl + Alt + Shift + S.
A new box will popup with all of the settings for saving and optimizing an image
for the web:
1. Choose a file format.
2. Choose an image size at which to save your image.
3. Choose a quality level for jpg or number of colors for gif.
4. Choose a location for your file on your drive.
If you want to make transparent picture then select transparent chek box ON. And
select gif file format. The usual preferred file type of photographs is JPEG,
which is named after its creators, the “Joint Photographic Experts Group“.
Changing Measurement Unit and Ruler in Photoshop.
Do one of the following:
1. Double-click a ruler.
2. OR Choose Edit > Preferences > Units & Rulers, or right-click the ruler and
then choose a new unit from the context menu.
3. For Rulers, choose a unit of measurement.
4. Note: Changing the units on the Info panel automatically changes the units on
the rulers.
5. For Point /Pica Size, choose from the following options:
6. PostScript (72 points per inch)Sets a unit size compatible for printing to a
PostScript device.
7. Traditional Uses 72.27 points per inch, as traditionally used in printing.
8. Click OK.
Create Swatches in Photoshop
If you have an image with the colors you want to use, you can use the eyedropper
tool to select colors from your image, then add them to the swatch palette and
make a custom swatch collection one color at a time. If that sounds time
consuming to you, you'll be glad to know that you can create a custom swatch
collection from the colors in an existing image. The following process creates
the custom color switches.
1. Open the image, which have some color in Photoshop. Make a copy choose Image
> Duplicate.
2. To reduce the number of colors in the image down to 256, choose Image > Mode
> Indexed. If your image is in CMYK mode, you’ll need to convert it to RGB and
then Indexed. A dialog box opens up with options for converting your image to
Indexed Color. Choose Local (Perceptual) in the Palette drop down box.
3. Now choose Image > Mode > Color Table to view it and the colors selected from
your image.
4. Now you can save the table click on Save button on the Color Table dialog box
and then save it into Photoshop > Presets > Color Swatches folder.
5. To load up your palette with your new swatches, open the Swatches palette and
from the drop down menu in the top right corner choose Replace Swatches. Browse
to the folder where you saved your color table and open up the new palette.
Palettes can be saved as .ASE, .ACT or .ACO so make sure you are searching for
the file format that you saved you swatches in.
Create a Custom Brush in Photoshop
In Adobe Photoshop there are many type of pre set brush and there sizes. but
adobe also provide a facility that we create our own custom type of brush. The
following procedure is used for this purpose:
1. First of all create a new document.
2. Now select the Brush Tool from the Tools palette
3. Select any pre set brush for example Small Round Brush.
4. Make sure the foreground color is set to black.
5. Now paint the brush strokes inside the document (in that way which type of
brush you want).
6. Now click on Edit menu and choose Define Brush Preset.
7. In next step give the name to brush and click on ok.
8. New brush is now created and added in the brush list.
9. You can select you own custom type and then use it.
Create an Action in Photoshop
When we perform some set of instruction in Photoshop again and again in same way
then this is the best way that we create an action. store the set of instruction
and call back when you need. In action the step you perform recorded and we can
use these step again by pressing one single key in future.
Now we discuss how an Action is created in Photoshop:
Proceed following steps one by one:
1. Open a file in Photoshop
2. Click on action Tab in History Panes.
3. At the top right of the Actions box or palette, there is an arrow. Click here
to open more options and select New Action.
4. Name your Action and assign a Function Key.
5. Your recording will start you can stop recording by clicking on stop button
in Action panes.
6. Now perform some steps. i am going to set the brightness of my image. After
setting the brightness click on stop button.( you can perform any set of
instruction)
7. How we use These Action:
8. Now close everything and don't save this image.
9. Open again this image in previous condition and click on action form History
Panes.
10. Select your action from list and click on play button ( you can also press
you function key which you specify at the time of recording.)
11. You can see the brightness of your image automatically adjust.
Notes of Computer Network
Notes of MS Access
Notes of Adobe Photoshop For DIT
Notes of Inpage
Notes of Database
Notes of E-Commerce
Notes of Web Technology / HTML
Notes of Microsoft Word 2007
Notes of MS Excel 2007
Notes of C Language
Notes of Operating System For DIT
Notes of information technology Part -1
Notes of information technology Part -2
Notes of CorelDraw
Notes of Power Point